Wifi NTP Clock ( ESP8266 with TM1637 ) 
Sunday, April 5, 2020, 15:58
Posted by Administrator


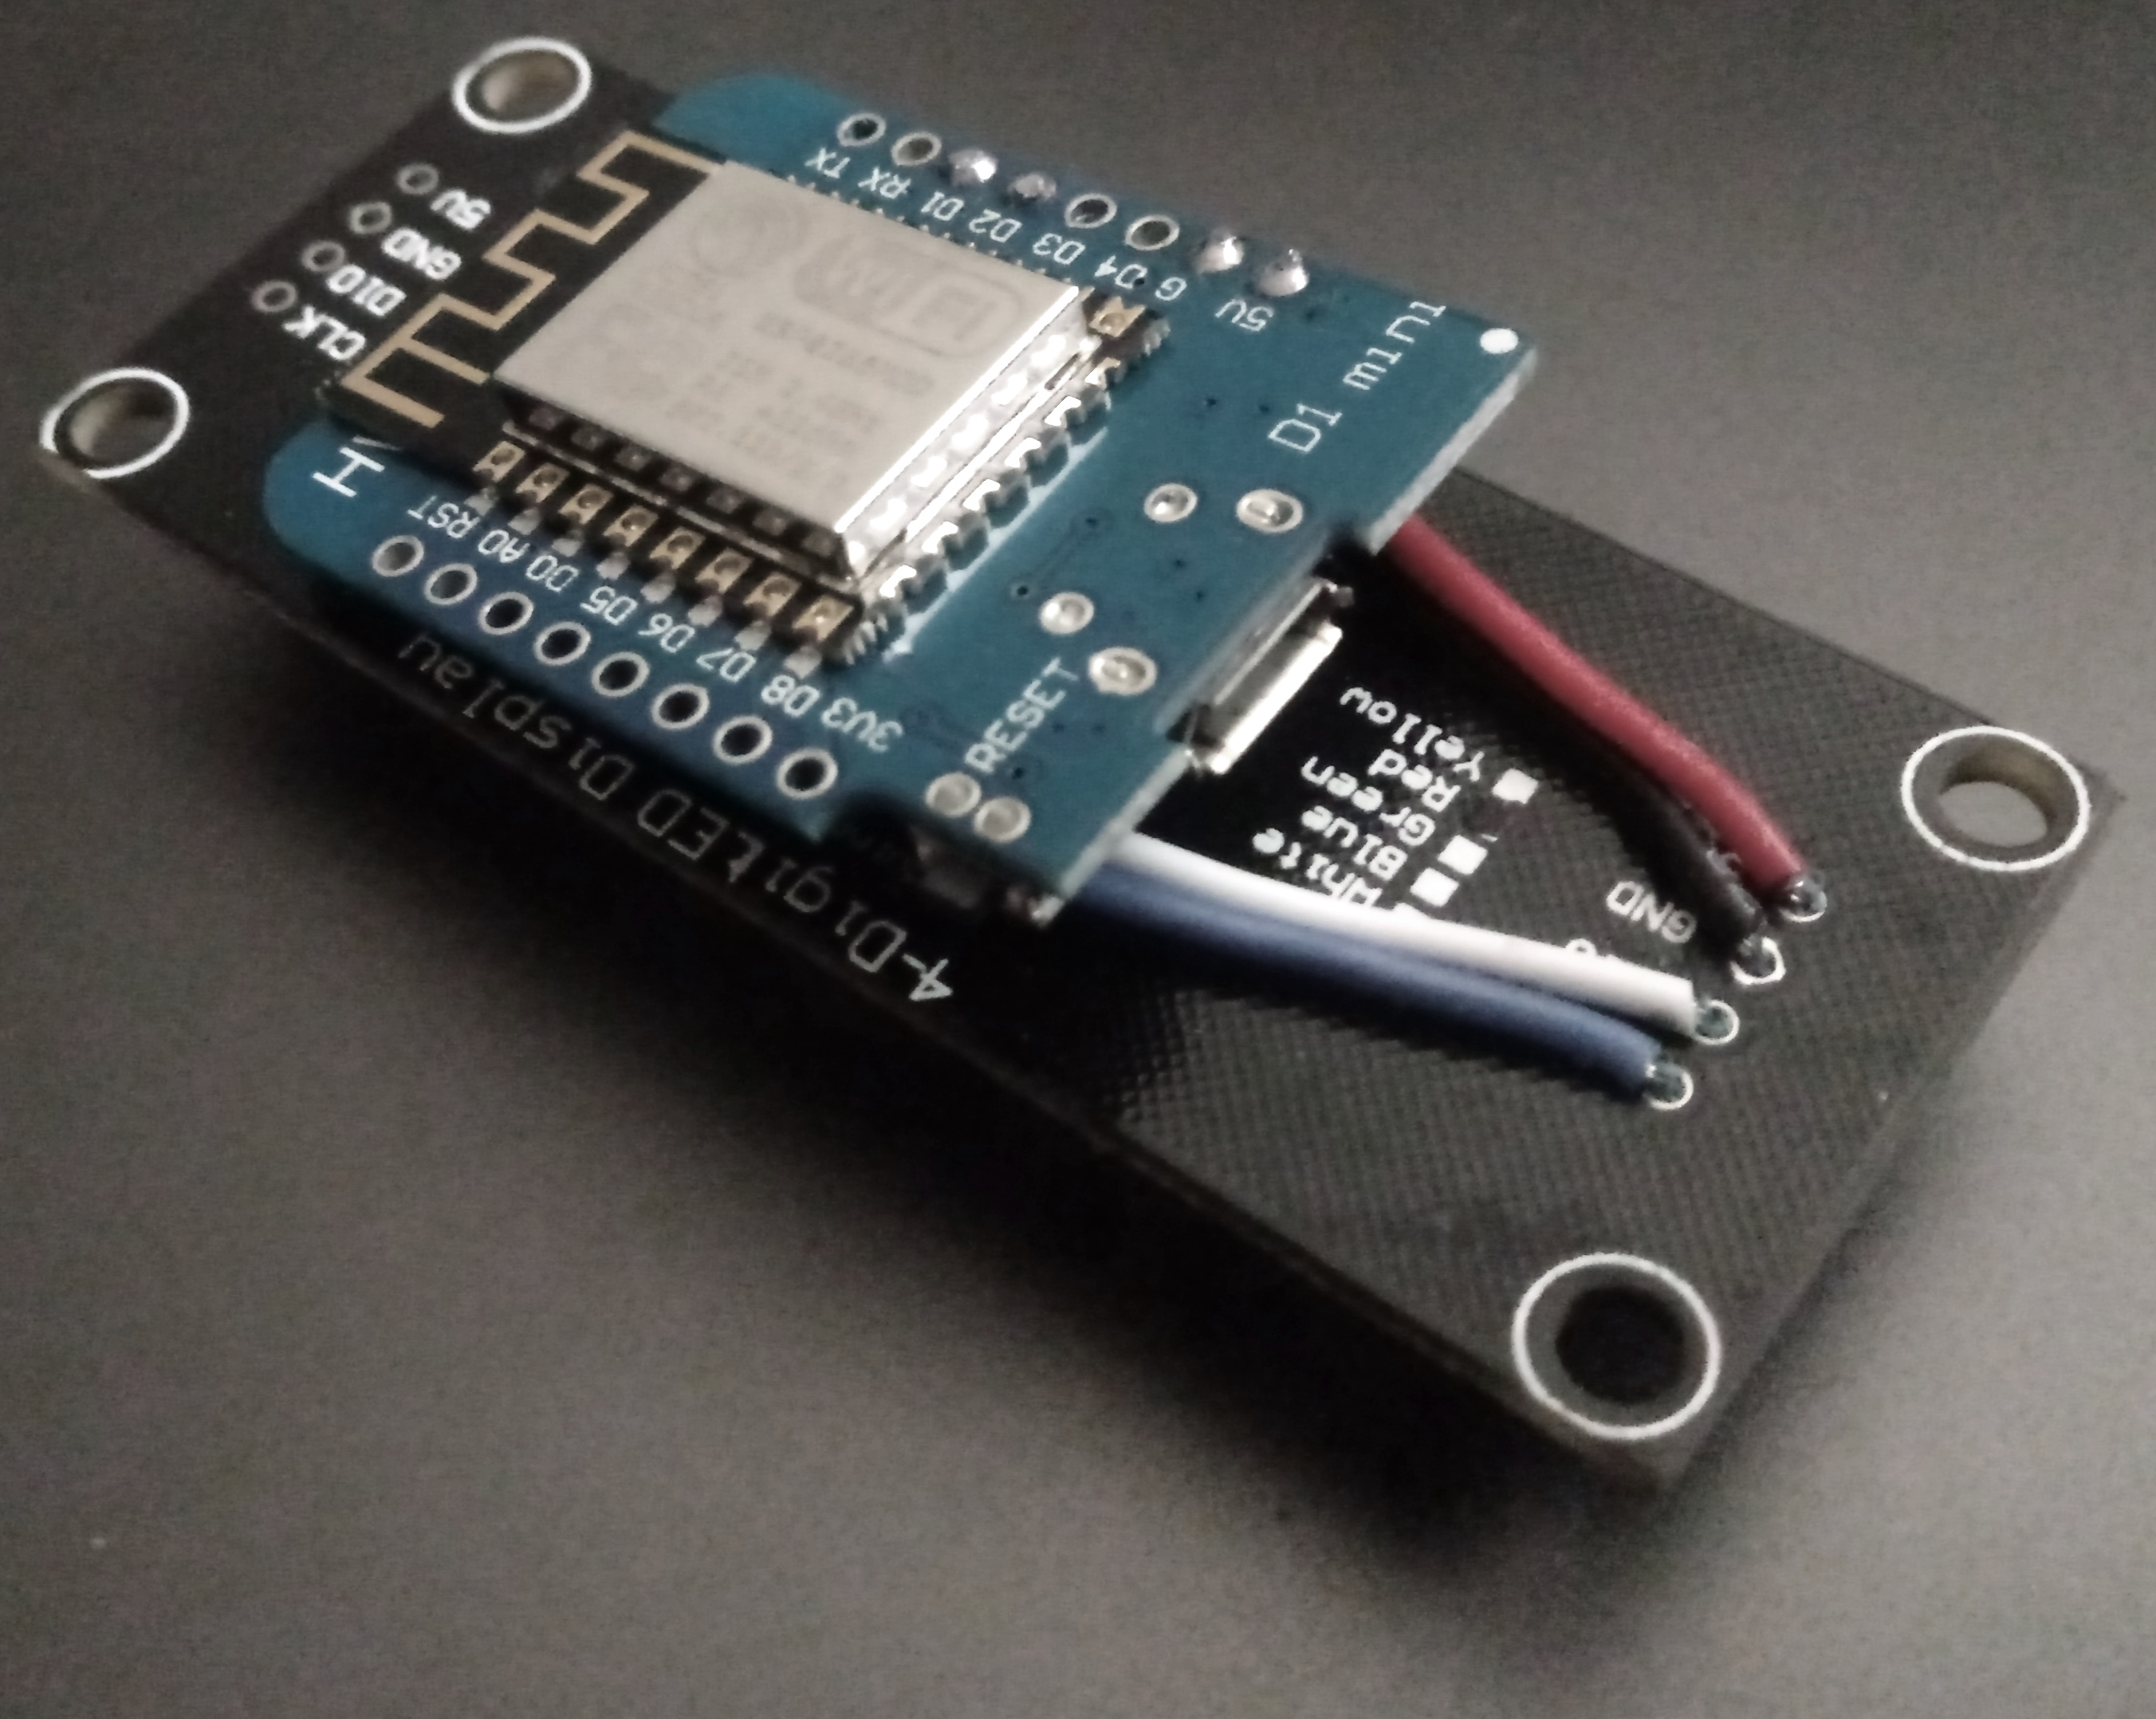
My latest passion project incorporates a cheap Wemos D1 Mini clone board ( ~2$ each on eBay ) with integrated wifi along with a TM1637 4-Digit Led display module ( ~ $1 each ) to create an incredibly accurate self-adjusting wifi clock. I had previously been using 4-Digit displays by individually addressing all the necessary inputs, but it takes a whole ratking of wires to do that and the cost savings are negligible compared to the TM1637 modules that can be found overseas.

The Wemos D1 Mini clones have become my go-to board for projects like these both because of their low cost and versatility. The Digispark boards I sometimes use still have them beat on price, but only by about 60 cents or so, and those don't have wifi so they wouldn't be suitable for this project.

The code is very straightforward after all the necessary board and module libraries are gathered and can be found below:
// Add ESP8266 board from https://arduino.esp8266.com/stable/package_esp8266com_index.json ( File > Preferences, Tools > Board > Board Manager )

#include <TM1637Display.h> // https://github.com/avishorp/TM1637
#include <NTPClient.h> // https://github.com/arduino-libraries/NTPClient
#include <ESP8266WiFi.h>
#include <WiFiUdp.h>

// Set up the character arrays for the Wifi ssid and password
const char *ssid = "********";
const char *password = "********";

// Set the UTC Time offset in seconds
// const long utcOffsetInSeconds = -21600;
const long utcOffsetInSeconds = -18000;

// Define NTP Client to get the time
WiFiUDP ntpUDP;

// Set up the Network Time Protocol Client, update with fresh time every 10 minutes
NTPClient timeClient(ntpUDP, "85.21.78.23", utcOffsetInSeconds, 600000);

// Module connection pins (Digital Pins)
#define CLK 5
#define DIO 4

// Set up the TM1637 Display
TM1637Display display(CLK, DIO);

void setup() {

// Set the brightness of the display ( 0xff is brightest )
display.setBrightness(0x1a);

// Connect to the wifi point
WiFi.begin(ssid, password);

// Wait for the wifi to be connected
while ( WiFi.status() != WL_CONNECTED ) {
delay(500);
}

// Start the time client
timeClient.begin();

}

void loop() {

// Update the time client to get the current time
timeClient.update();

// Display the hours
display.showNumberDecEx(timeClient.getHours(), 0b11100000, true, 2, 0);

// Display the minutes
display.showNumberDecEx(timeClient.getMinutes(), 0b11100000, true, 2, 2);

}
I'm running it without an enclosure but have carefully soldered the necessary wires in place on the back of the board and then have hot-glued the whole assembly together such that the front-facing side of the clock fully obscures the D1 Mini behind it:


The mounting holes on the 4-Digit display make for easy attaching to the wall with push pins, but the unit can also just be set by itself on a desk because it is self-supporting. It consumes little power, and I've run it successfully on some portable battery packs for many days. Most of the time I leave it nestled into a piece of driftwood in the bedroom.

I initially ran into an issue where the time would sometimes stop getting set and start to drift. I was able to correct this by using the specific IP address of the NTP ( Network Time Protocol ) server I like best, instead of relying on a DNS to get the IP for me. I suspect that after enough reconnects the DNS handler stops working correctly and causes the library I'm using to fail after enough attempts. Since changing to a set IPv4 address I've had no issues with the clock at all and have found it to be extremely accurate even when running for many months in a row.

The real beauty of this project is its simplicity. Plug in the clock, it sets itself, you're done. Altogether the cost of all wires, hotglue, solder, and modules for this project is well below $4. A future improvement I'd like to make to this would be to more intelligently handle daylight savings time because right now the board has to be re-flashed every time that this is in effect.

Comments are very much welcome.
add comment ( 5012 views )   |  permalink   |  $star_image$star_image$star_image$star_image$star_image ( 3.1 / 3940 )
Morse Code Tao Te Ching Flashing on the Arduino 
Saturday, August 31, 2019, 14:44
Posted by Administrator


This year I have been experimenting quite a bit with the Arduino platform. I love how Arduino clones are much cheaper than Raspberry Pi’s and only cost me around 2 dollars each from China. Arduinos also consume very little power and run for many days on my rechargeable external battery packs.

Long ago I created a blinking morse code light on a Raspberry Pi which slowly flashed the Tao Te Ching. It was a relatively straightforward process as there is far more than enough storage available on virtually any Micro Sd card to hold even the largest of books. 
 
My first true Arduino project was to remake my morse code Tao Te Ching light. Getting the Arduino to flash morse code was straightforward and lots of people have worked up examples that got me started. I made many modifications to some code I found online, and eventually got the Litany Against Fear from Dune to flash out on a small white LED:

// Message
byte m[] = "I MUST NOT FEAR. FEAR IS THE MIND-KILLER. FEAR IS THE LITTLE-DEATH THAT BRINGS TOTAL OBLITERATION. I WILL FACE MY FEAR. I WILL PERMIT IT TO PASS OVER ME AND THROUGH ME. AND WHEN IT HAS GONE PAST I WILL TURN THE INNER EYE TO SEE ITS PATH. WHERE THE FEAR HAS GONE THERE WILL BE NOTHING. ONLY I WILL REMAIN.";

// Pin to flash
int pin = 13;

// Tempo
// 240 ~5wpm
// 120 ~10wpm
// 80 ~15wpm
int t = 240;

// Setup the output pin
void setup () {
pinMode(pin, OUTPUT);
}

// Perform the dits
void d() {
digitalWrite(pin, HIGH);
delay(1 * t);
digitalWrite(pin, LOW);
delay(1 * t);
}

// Perform the das
void da() {
digitalWrite(pin, HIGH);
delay(3 * t);
digitalWrite(pin, LOW);
delay(1 * t);
}

// Define the pattern of dits and das for each letter
void morse(byte l) {
if (l == 'A' or l == 'a') {d(); da();}
else if (l == 'B' or l == 'b') {da(); d(); d(); d();}
else if (l == 'C' or l == 'c') {da(); d(); da(); d();}
else if (l == 'D' or l == 'd') {da(); d(); d();}
else if (l == 'E' or l == 'e') {d();}
else if (l == 'F' or l == 'f') {d(); d(); da(); d();}
else if (l == 'G' or l == 'g') {da(); da(); d();}
else if (l == 'H' or l == 'h') {d(); d(); d(); d();}
else if (l == 'I' or l == 'i') {d(); d();}
else if (l == 'J' or l == 'j') {d(); da(); da(); da();}
else if (l == 'K' or l == 'k') {da(); d(); da();}
else if (l == 'L' or l == 'l') {d(); da(); d(); d();}
else if (l == 'M' or l == 'm') {da(); da();}
else if (l == 'N' or l == 'n') {da(); d();}
else if (l == 'O' or l == 'o') {da(); da(); da();}
else if (l == 'P' or l == 'p') {d(); da(); da(); d();}
else if (l == 'Q' or l == 'q') {da(); da(); d(); da();}
else if (l == 'R' or l == 'r') {d(); da(); d();}
else if (l == 'S' or l == 's') {d(); d(); d();}
else if (l == 'T' or l == 't') {da();}
else if (l == 'U' or l == 'u') {d(); d(); da();}
else if (l == 'V' or l == 'v') {d(); d(); d(); da();}
else if (l == 'W' or l == 'w') {d(); da(); da();}
else if (l == 'X' or l == 'x') {da(); d(); d(); da();}
else if (l == 'Y' or l == 'y') {da(); d(); da(); da();}
else if (l == 'Z' or l == 'z') {da(); da(); d(); d();}
else if (l == '1') {d(); da(); da(); da(); da();}
else if (l == '2') {d(); d(); da(); da(); da();}
else if (l == '3') {d(); d(); d(); da(); da();}
else if (l == '4') {d(); d(); d(); d(); da();}
else if (l == '5') {d(); d(); d(); d(); d();}
else if (l == '6') {da(); d(); d(); d(); d();}
else if (l == '7') {da(); da(); d(); d(); d();}
else if (l == '8') {da(); da(); da(); d(); d();}
else if (l == '9') {da(); da(); da(); da(); d();}
else if (l == '0') {da(); da(); da(); da(); da();}
else if (l == '.') {d(); da(); d(); da(); d(); da();}
else if (l == ',') {da(); da(); d(); d(); da(); da();}
else if (l == '?') {d(); d(); da(); da(); d(); d();}
else if (l == '\'') {d(); da(); da(); da(); da(); d();}
else if (l == '!') {da(); d(); da(); d(); da(); da();}
else if (l == '/') {da(); d(); d(); da(); d();}
else if (l == '(') {da(); d(); da(); da(); d();}
else if (l == ')') {da(); d(); da(); da(); d(); da();}
else if (l == '&') {d(); da(); d(); d(); d();}
else if (l == ':') {da(); da(); da(); d(); d();d();}
else if (l == ';') {da(); d(); da(); d(); da(); d();}
else if (l == '=') {da(); d(); d(); d(); da();}
else if (l == '+') {d(); da(); d(); da(); d();}
else if (l == '-') {da(); d(); d(); d(); d(); da();}
else if (l == '_') {d(); d(); da(); da(); d(); da();}
else if (l == '"') {d(); da(); d(); d(); da(); d();}
else if (l == '$') {d(); d(); d(); da(); d(); d(); da();}
else if (l == '@') {d(); da(); da(); d(); da(); d();}

// Plus the two below equals a delay of 7 tempos for a space
if (l == ' ') {delay(5 * t);}

// Delay of 3 tempos, 2, plus the delay after a character
delay(2 * t);

}

// Loop through the message
void loop () {

// For each character in the message
for (int g = 0; g < sizeof(m); g++) {

// Flash the morse equivalent for this letter
morse(m[g]);

}

}

The real challenge was in getting an entire book to fit on an Arduino. Most standard Arduino’s such as the Arduino Nano clones that I’m using have roughly 32K of storage space for holding programs. You get even less than this in reality since a typical bootloader for the Arduino takes .5K – 2K of the space before you even load your code on there. Even though the morse code flashing instructions I put together are relatively small, there was still not nearly enough space left to hold my favorite copy of the Tao Te Ching translated by Stephen Mitchell.

His translation is around 37.32K and my original hope was that if I removed all the line breaks, and most of of the punctuation that I could get it to fit somehow. However, after adding in the additional code for flashing the LED and the bootloader, it became apparent that there was just no way this was going to work. I then pondered over it all for a couple of days.

Compression is the natural solution to this problem. I was able to find a wonderfully up to date text compression utility called Shox96. It is a hybrid entropy and dictionary encoder and the author has put together a great white paper on the design which is well worth reading. It also has a version which works great at compressing short strings into the Arduino program memory.

After compressing Stephen Mitchell’s translation of the Tao Te Ching with Shox96 and then decompressing one chunk at a time and feeding that into my morse code flashing program it all worked perfectly. I had the entire book flashing before my eyes. 
 
There was even plenty of free space left over. So I decided to make things a lot harder and use this public domain translation of the Tao Te Ching by John H. McDonald which is ~45.70K in size when not compressed. After compressing it… it did not fit on the Arduino anymore.

I continued to poke at it and eventually realized that Shox96 encoding is more efficient when the lines of text are long. I then went through the full text manually and increased the line sizes to mostly be full sentences. Compressing this version got it all plenty small enough and I finally considered the project to be finished.

I left the light blinking for many weeks running off of the USB port on the side of my office monitor. At the slow speed I set it at it takes longer than a day to run through the entire book, at this point it loops and starts from the beginning. I left serial debugging on, so if you monitor the serial output of the device you can watch it print each character to the screen as it flashes. This looked especially nice when paired with outputting to a CRT television. I ran it this way for many days as well. 
 
This project helped me get quite a bit more familiar with Arduino’s and making use of additional libraries when working on sketches. The final flashing art piece also got me much better at sight-reading morse code which was a nice bonus.
 
The full code for this project is available here. Let me know if you can think of any other great books that would benefit from this sort of harassment.
add comment ( 2578 views )   |  permalink   |  $star_image$star_image$star_image$star_image$star_image ( 3 / 3193 )
Javascript Flasher Clock 
Sunday, March 25, 2018, 08:12
Posted by Administrator
I have been using my minimalistic Pi Zero W flasher clock for a while now and have found it to be an exceptionally soothing way to check on the current time. I recently ported the code over to work on the Pi 3 B+ and have edited my previous post about it to include both versions.

The only trouble with this clock has been that the code for it is very specifically for a Raspberry Pi, and I have found myself wanting to have a flashing clock indicator like this on other devices like phones, televisions, etc. Clearly, the flasher clock I designed was in need of another port, so set of to re-create it in Javascript.

It was a much more interesting challenge to get this working in Javascript than I expected it to be since Javascript is non-blocking and there is no built-in way to pause execution and sleep as you can with bash scripting. However, with some new features that most modern browsers take advantage of, Javascript is now capable of handling asynchronous functions natively and can use the async/await keywords to sort of hold off on execution until a promise for the await returns.

With async/await and promises, I was able to create a helper function to simulate a similar sleep behavior that my original script had without having to re-design everything to work as a weird sort of state machine using setTimeouts. This new code could have certainly be re-written to not use async/await but I believe it would be a lot less straightforward to make sense of that way. I was also able to take advantage of another ES6 addition, arrow functions, to streamline this custom wait function into the following one-liner:

var wait = t => new Promise(resolve => setTimeout(() => resolve(), t));

This function, wait, takes a variable t which is the time in milliseconds that the setTimeout should wait until returning a promise. With this component in place I had everything I needed to finish up converting my original design into something that could run in any modern browser:

<html>
<head>
<title>Javascript Flasher Clock</title>

<script>

// Set up our colors array
const colors = [
'#FFFFFF',
'#FF0000',
'#FF8000',
'#FFFF00',
'#80FF00',
'#00FF00',
'#00FF80',
'#00FFFF',
'#0080FF',
'#0000FF',
'#7F00FF',
'#FF00FF',
'#FF007F'
];

// Set up our default color index
var c = 0;

// Set up our base wait time
var w = 50;

// Define the wait function, a promise that waits for a setTimeout of length t before returning
var wait = t => new Promise(resolve => setTimeout(() => resolve(), t));

// A function to change the color
function changeColor() {

// If we are at the end of the colors array set c back to the first value
if ( c === colors.length - 1) {

// Set c back to the first color
c = 0;

}

// Else we just need to increment our color value c
else {

// Increment c
c++;

}

}

// Define our clock function using async so that we can use await
async function clock() {

// Set the default background color to black at the beginning of each cycle
document.body.style.background = '#000000';

// Wait for a long while so that we separate our flasher clock cycles
await wait(w * 40);

// Get the current date
let date = new Date();

// Get the current number of hours
let hours = ((date.getHours() + 11) % 12 + 1);

// Get the current number of tens digits
let tensDigits = (date.getMinutes() < 10 ? '0' : '' + date.getMinutes()).substring(1,0);

// Flash the current number of hours
for (let h = 0; h < hours; h++) {

// Wait a while
await wait(w*8);

// Set the screen to the colors c value
document.body.style.background = colors[c];

// Wait another while
await wait(w*8);

// Set the screen back to black
document.body.style.background = '#000000';

}

// Wait a medium while between the hours and tens digits flashes
await wait(w*20);

// Flash for the current number of tens digits
for (let t = 0; t < tensDigits; t++) {

// Wait a little while
await wait(w*5);

// Set the screen to the colors c value
document.body.style.background = colors[c];

// Wait another little while
await wait(w*5);

// Set the screen back to black
document.body.style.background = '#000000';

}

// Call this clock function again to start a new cycle
clock();

}
</script>

</head>
<body onload='clock()' onclick='changeColor()'>
</body>
</html>

I also added the capability to click anywhere on the screen to cycle through many different color codes so that the one can switch up the display color of the flash easily even if using a phone.

As with the original design, the clock flashes for the current number of hours ( in 12-hour format ) and then flashes a little more quickly once for every current tens digit of minutes. For example, if the time is 6:38 the clock will flash 6 times somewhat slowly, and then three times somewhat faster. I decided that the clock should be in 12-hour format in order to cut down on the number of flashes one would potentially have to watch in each cycle. Similarly, I have foregone the full number of minutes to cut down on the number of flashes one would have to count. Staying within ten minutes of accuracy seems like a good compromise between the time necessary to read the clock and precision to me.

The Javascript Flasher Clock can be experienced here.

I'm very happy with the results. It was great to finally make use some of the newest additions to Javascript. These new features made it possible for me to rewrite my original script much more easily than I had originally imagined.

My plan is to shine a phone running this clock at a wall so that the whole wall is a time indicator, but I'm also interested in lighting up translucent objects so that the object itself can be the time indicator. A milk jug should work great for that, although it may look classier inside of a paper lantern.

-- Addendum, March 26 2018

I have found a nice opaque white container that diffuses a phones display well and have placed it in the middle of my indoor sand garden. The phone is able to remain charged by keeping it plugged in with a hole for the cord I made in the back of the container. It then struck me that I had no way to change the light color or intensity once everything was assembled in the jar, but this was easily solved by adding Teamviewer Host to the phone and the remotely controlling phone from another device to change the display brightness or cycle through color options.
add comment ( 2388 views )   |  permalink   |  $star_image$star_image$star_image$star_image$star_image ( 2.8 / 3744 )

<Back | 1 | 2 | 3 | 4 | 5 | 6 | 7 | 8 | 9 | Next> Last>>